By Morgan Sprigler
I recently arrived back home from witnessing my baby brother marry his sweetheart and am feeling especially sentimental at the moment. Watching him smile ear to ear (literally, it looked a little painful) will be a vision etched in my mind and in my heart for a very long time.
Because I was so moved with this theme, several wedding-related ideas were bouncing around in the crafty section of my brain and I just couldn’t decide on one! So, I headed to Ben Franklin Crafts, 420 New Albany Plaza, for some extra inspiration.
While strolling through the store, I came up with a lovely idea for a table setting. If you like all things shabby-chic like me, I think you will really enjoy this idea.
 SUPPLIES:
– WOODEN BIRDHOUSE
– WOODEN MINIATURE PLANTERS
– WOODEN NUMBERS
– MINI WOODEN DOWELS
– PRESERVED MOSS
– CHALK PAINT (BLUSH IS SO PRETTY!)
– PAINT BRUSH
– CARDSTOCK
– THIN TIP SHARPIE
– GLUE GUN
 STEP ONE – PAINT
I found the spray chalk paint by Rust-Oleum to be very simple to use. I used the color Blush Pink, which I absolutely love. I only applied one layer and let dry. For my table number and miniature planters, I applied Americana’s Chalky Finish Paint in Ivory using a paint brush.
STEP TWO – PLACE SETTINGS
Using a piece of the cardboard from the sandpaper packaging, I created a template for the place settings. I drew out a version of a scroll, but a long rectangle would serve the same purpose, as would any shape that you prefer. Once I had my template, I traced it onto my cardstock and cut out each one individually and then wrote the names on the front of the scroll. Finally, I used my glue gun to place a small dot on the back of the cardstock and secured a mini wooden dowel.
STEP THREE – DISTRESSS
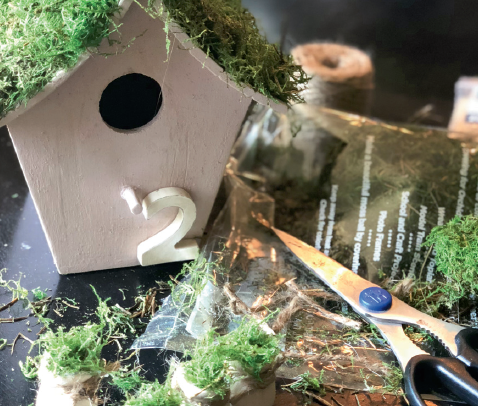
Because it was 103 degrees on the day I made these, my paint was dry as soon as I finished step two. Typically, you would need to let it dry for at least an hour. Once you’re sure your paint is dry and set, use the sand paper and start scrubbing away like you would on a really dirty pan (yuck). You can distress your birdhouse, wooden numbers and planters as much or as little as you like.
STEP FOUR – HOT GLUE
You should all know by now that I love some hot glue, so this was my favorite part. Glue a thin layer of moss on top of your birdhouse, making sure to cover it completely, while working in small sections. Bare spots don’t necessarily look great for this particular craft. Then, take about a quarter size and fill your planters with moss. (FYI – this is messy. You may want to lay down some newspaper).
STEP FIVE – FINISHING TOUCHES
Push your wooden dowel and name scroll into the mini planter. This should go in very easily and does not need glue to hold in place. Now you can set your tables. I loved how the planters looked underneath a wine glass. Now is the time to get creative and add flowers from your favorite florist, beautiful placemats, interesting china, etc.

I hope this helps to inspire those of you who are planning an upcoming wedding and want to add a DIY touch, no matter how small. Cheers to all of you beautiful brides and grooms! May your lives together be full of joy.
XO,
Morgan


