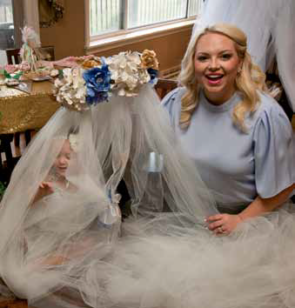
Meet Morgan Sprigler, the queen of crafting
If Pinterest were personified, her name would be Morgan Sprigler.
The Southern Indiana resident has been crafting since she was a little kid and inspiring plenty of others.
 “My mom tells me that, as a kid, I would always want to get myself dressed. My outfit of choice was a T-shirt – one of hers – and a little belt. I was looking for new ways to transform ordinary objects,” Sprigler said. The flawless wife and mama of two grew up with two sisters, whom she used to help get ready for dances and sleepovers. “I’ve always had a love for fashion and interior design,” she explained.
“In college (at Indiana State University), my friends would go out and party, and I would literally lock myself in my room and draw. I wanted to be a fashion designer – but I was not a very good artist – and I would sew for hours and hours.”
Fast forward to today, and you’ll often find Sprigler making crafts for those she loves, which result in keepsakes. “I create memories for my girls and my family, first and foremost, but also for my friends. I get so much enjoyment out of it.”
We asked Morgan to spread the wealth of her knowledge, so she shared a craft almost anyone can do:

TULLE CANOPY
I love a tulle canopy so much so, I have made three of them in the past year. They are perfect for a little girl’s room, reading nook, photo shoot, party decor or to romanticize your adult bedroom. It adds such an elegant, soft look to any decor. My daughters’ both love theirs.
SUPPLIES
16” wood embroidery hoop
30 yards of Tulle in preferred color
4 artificial floral arrangements
Pearls/rhinestones/embellishment (optional) 4” ribbon or spool of tulle
Rubber bands
Hot glue gun
Hot glue sticks
Scissors
Measuring tape
Hook
STEP ONE: Measure!
Figure out where your canopy will hang. Use a measuring tape from the hanging point all the way down to the floor, then add 5 inches (this will make sense in step 4). If you want the tulle to pool at the bottom (I personally love this look). add on about 5 additional inches to your measurement. I went with 76 inches.
STEP TWO: Cut!
Find an area in your home where you will have enough room to roll out your tulle. Use your measuring tape, and use the same measurement you configured in step 1. Then, simply cut! Thankfully, tulle is very forgiving, so your line does not have to be perfectly straight. (Side note: I was held back in kindergarten because I could not cute a straight line and still can’t!) Repeat this step until your tulle is gone. You will feel as though you have a lot of fabric, but trust me, you want this to be as full
as possible.
STEP THREE: Rubber Band!
When your tulle was purchased, it was most likely already folded in half. Unfold each panel and lay flat. Rubber band the top of each layer, just as you would a ponytail.
STEP FOUR: Assemble!
Lay your rubber-banded tulle panels around in an evenly spaced circle. Turn the screw on your embroidery hoop until the center hoop separates from the outer hoop. Simply pull the rubber banded sections through the center of your two hoops.
STEP FIVE: Secure!
Begin turning your screw back into place. Stop when you feel like each panel is secure, but do not screw all the way. You want to be able to shift the tulle throughout your hoop to ensure everything is spaced evenly, with a small opening at the front. Once you have each panel where you want it, turn the screw all the way back in place.
STEP SIX: Ribbon!
Cut three even pieces of ribbon or tulle, depending on how high or low you want your canopy to hang. A general length of 15” would be a good starting point. Simply knot the four pieces of ribbon around your hoop, one on each side and one in the back. You may have to separate the tulle a bit to get a secure knot. Once complete, knot the four pieces together at the very top, where it will hang from a hook in your ceiling.
STEP SEVEN: Decorate!
Now for the fun part: Arrange your flowers however you prefer around your hoop, securing with hot glue. Add pearls, rhinestones or whatever your heart desires!
STEP EIGHT: Hang!
Secure your hook to your ceiling and simply hang your beautiful creation! To help your canopy hang evenly, push your hook through your top knot. Ta-Da! Look for more Made by Morgan crafts in upcoming issues of Extol.


